There is the odd spot on the Cadiz where Mr.Bailey has been a little profligate with the sealing gun.
One place is around the door catch on the main caravan door and the other is at the ends of the rain gutter above the awning light.
There are on or two other places as well.
I had tried to remove it wthe Silky,Care-A-Van cleaner and a dab of WD40 but none was a success.
Then some kind soul on Caravan Talk suggested applying white spirit to soften it,scrape the sealant away with a none-sharp object ( it become so soft I used a fingernail ),cleaning up with meths and repolishing.
Hey presto! it worked and the sealant has gone.
Ian
Saturday, 18 July 2015

Sunday, 12 July 2015
Latest Trip.
Just returned from three nights at Hargill House CC site just off the A66 in North Yorkshire.
Lovely little site but as with a number of CC sites we have visited the shower block whilst perfectly clean and servicable could do with updating.
According to a comment in the visitors book this will be done over the forthcoming winter.
Anyway onto the Cadiz and I am pleased to say we had no problems,niggles,disasters or mishaps at all.
Everything worked as it should,the flip up table gave no further trouble and the Alde battery back up worked well
Sadly it doesn't make for an interesting blog post but so be it,long may it last.
Ian
Lovely little site but as with a number of CC sites we have visited the shower block whilst perfectly clean and servicable could do with updating.
According to a comment in the visitors book this will be done over the forthcoming winter.
Anyway onto the Cadiz and I am pleased to say we had no problems,niggles,disasters or mishaps at all.
Everything worked as it should,the flip up table gave no further trouble and the Alde battery back up worked well
Sadly it doesn't make for an interesting blog post but so be it,long may it last.
Ian
Wednesday, 8 July 2015
Fitting Alde Battery Back Up For The Clock.
On the Alde 3020HE control panel the clock can be set to show the time and the day of the week.
If desired this can be displayed on the panel.
Unfortunately if the 12v is switched off for any reason then the clock settings are erased so it has to be reset when the 12v is switched back on again.
For those that aren't aware,Alde do a plug in battery back up for the clock ( why this couldn't be fitted as standard on a £21K van I don't know ) which has to be retro-fitted and contains two AA batteries to keep the clock running.
This is what I am talking about:-
Alde Battery Back Up
( Other outlets are available ).
Turn off 12v power supply before proceeding.
Having decided to fit one of these I was a bit nervous as to how to remove the front panel which seemed to fit tightly and I didn't want to break it..
I even bought a set of plastic car panel removers.
Fortunately and to my surprise the front cover pulled off quite easily.
You are then presented with this :

There is cross head screw at each corner which are easily removed ,the unit can then be pulled forward out of its aperture to reveal this :-

The black object is a black plastic cover which can easily be removed by unclipping at the sides to expose the innards :

Complicated little bugger isn't it.
Next take a soldering iron and some wire cutters..............................no only joking.
Now the instructions I received with the unit I purchased showed a diagram of the above which resembled it not at all,probably because it was old stock and for use with the 3010 boiler,so I had to plug the backup device cable into each of the four plugs in turn at the top left of the above picture until I found the correct one.
It is the one on the far left where the black and red wires are plugged into in the picture.
It was then I glanced at the inside of the previously removed black cover where there is a diagram which tells you where everything goes......................hmmmm.
I then attached the battery caddy complete with two AA Duracells ( well Costco really ) to the side of the cubby hole with double sided tape ( there are two pre-drilled holes for screws if you prefer,screws not provided ) then,in the words of the Haynes manuals " reassembly is the reverse of removal".
Unlike the Haynes this actually is.
Be careful to feed the cables out of the cut away at the bottom of the black back cover before clicking the cover back in place.
Screw it back to the van with the four screws and replace the grey cover.
Job done,switch on the 12v and set the clock and it will stay that way until the Earth becomes a Red Dwarf or Coronation St. ends which ever is the sooner.
If I can do it,you can do it.
Ian
If desired this can be displayed on the panel.
Unfortunately if the 12v is switched off for any reason then the clock settings are erased so it has to be reset when the 12v is switched back on again.
For those that aren't aware,Alde do a plug in battery back up for the clock ( why this couldn't be fitted as standard on a £21K van I don't know ) which has to be retro-fitted and contains two AA batteries to keep the clock running.
This is what I am talking about:-
Alde Battery Back Up
( Other outlets are available ).
Turn off 12v power supply before proceeding.
Having decided to fit one of these I was a bit nervous as to how to remove the front panel which seemed to fit tightly and I didn't want to break it..
I even bought a set of plastic car panel removers.
Fortunately and to my surprise the front cover pulled off quite easily.
You are then presented with this :

There is cross head screw at each corner which are easily removed ,the unit can then be pulled forward out of its aperture to reveal this :-

The black object is a black plastic cover which can easily be removed by unclipping at the sides to expose the innards :

Complicated little bugger isn't it.
Next take a soldering iron and some wire cutters..............................no only joking.
Now the instructions I received with the unit I purchased showed a diagram of the above which resembled it not at all,probably because it was old stock and for use with the 3010 boiler,so I had to plug the backup device cable into each of the four plugs in turn at the top left of the above picture until I found the correct one.
It is the one on the far left where the black and red wires are plugged into in the picture.
It was then I glanced at the inside of the previously removed black cover where there is a diagram which tells you where everything goes......................hmmmm.
I then attached the battery caddy complete with two AA Duracells ( well Costco really ) to the side of the cubby hole with double sided tape ( there are two pre-drilled holes for screws if you prefer,screws not provided ) then,in the words of the Haynes manuals " reassembly is the reverse of removal".
Unlike the Haynes this actually is.
Be careful to feed the cables out of the cut away at the bottom of the black back cover before clicking the cover back in place.
Screw it back to the van with the four screws and replace the grey cover.
Job done,switch on the 12v and set the clock and it will stay that way until the Earth becomes a Red Dwarf or Coronation St. ends which ever is the sooner.
If I can do it,you can do it.
Ian
Thursday, 2 July 2015
Yer Could Stand An Elephant On It Now.
Was up at the van today and reinforced the flip up kitchen shelf as previously described with a wooden batten,drilling right through the panel and securing with four bolts.


It has made the shelf much more secure now.
It was never going to survive in its original state with screws millimetres long.
I am not the worlds best DIY'er so quite pleased with the outcome.
If anyone is thinking of doing this the bolts are 5cm long ( depending of course on the thickness of your piece of wood ).
Cost :- £1.50 for for four bolts,four nuts and four washers.
Wood free out of garage.
Ian


It has made the shelf much more secure now.
It was never going to survive in its original state with screws millimetres long.
I am not the worlds best DIY'er so quite pleased with the outcome.
If anyone is thinking of doing this the bolts are 5cm long ( depending of course on the thickness of your piece of wood ).
Cost :- £1.50 for for four bolts,four nuts and four washers.
Wood free out of garage.
Ian
Monday, 29 June 2015
Second Trip & That Flip Up Table Again.
Yesterday we returned from four nights at Burford Caravan Club site in the Cotswolds.
An excellent venue in tip-top order
Two recommendations,visit the Cotswold Wildlife Park across the lane and Chedworth Roman Villa about 15 miles away.
The Cadiz behaved impeccably both under tow and for the duration of our stay apart from my old friend the flip up table in the kitchen.
Yes I leant on it again and once more the screws came out depositing a kettle full of ( cold ) water over the front seat.
So it was cushion outside to dry and another repair undertaken with some plugs and No More Nails this time but sadly it didn't look right so I have brought the table home and I am going to drill right through the panel and place a wooden batten behind in the cupboard and bolt it through,seems the only way to make a secure job of it.
Now yes it was my fault for leaning on the table but upon examination of the screws they are ridiculously short to support a table ( see pic ).

In my humble opinion they are never going to do a great deal except cause future trouble.
During the proceedings SWMBO had risen from her bed to see what all the commotion was about along with a selection of sighs and tuts.
Then to compound matters when I had finished the first repair I put the screwdriver down on the back of the front seat where it promptly vanished down the back of the cushion and landed vertically in the Alde radiator fins.
Not really knowing how to retrieve it I unscrewed a wooden board at the bottom of the cushion but that didn't make any differece so back it went.
As I could just see the screwdriver I managed to get my hand down behind the heating board and after a lot of effort managed to get it out.
Motto:- Don't put anything on the top of the seat back cushions.
All this before 8:30am.
Whilst dismantling the superstructure I came across a "secret" compartment behind the front armrests which I didn't know was there.

It is useful for keeping valuables away from prying eyes when out of the van.
There is one on the other side too.
I had rather more luck with an adapation I made for the TV.
We were on a serviced pitch with TV supplied via the bollard.
Previously in the Orion we had to put the ariel wire through the window into the back of the TV to get reception off the site supply.
As the Cadiz has an exterior satellite point I attached a satellite plug to coax converter to it and plugged in the coax from the bollard.
Up at the business end I purchased a three way splitter off E-Bay,disconnected the blue tagged wire from the Vision Plus signal amplifier ( this blue tagged wire comes from the "satellite in" on the side of the van ) and plugged it into the inward side of the splitter.
Then I disconnected the two wires that feed the two TV points and connected them to the outward part of the splitter ( see pic ).
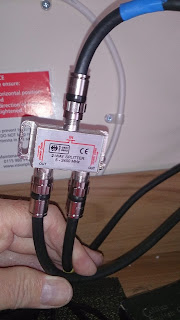
It all worked rather surprisingly well and is easier to do than explain.
I am going to do the shelf repair later in the week when I have located some suitable bolts so will post on how it went.
Ian
An excellent venue in tip-top order
Two recommendations,visit the Cotswold Wildlife Park across the lane and Chedworth Roman Villa about 15 miles away.
The Cadiz behaved impeccably both under tow and for the duration of our stay apart from my old friend the flip up table in the kitchen.
Yes I leant on it again and once more the screws came out depositing a kettle full of ( cold ) water over the front seat.
So it was cushion outside to dry and another repair undertaken with some plugs and No More Nails this time but sadly it didn't look right so I have brought the table home and I am going to drill right through the panel and place a wooden batten behind in the cupboard and bolt it through,seems the only way to make a secure job of it.
Now yes it was my fault for leaning on the table but upon examination of the screws they are ridiculously short to support a table ( see pic ).

In my humble opinion they are never going to do a great deal except cause future trouble.
During the proceedings SWMBO had risen from her bed to see what all the commotion was about along with a selection of sighs and tuts.
Then to compound matters when I had finished the first repair I put the screwdriver down on the back of the front seat where it promptly vanished down the back of the cushion and landed vertically in the Alde radiator fins.
Not really knowing how to retrieve it I unscrewed a wooden board at the bottom of the cushion but that didn't make any differece so back it went.
As I could just see the screwdriver I managed to get my hand down behind the heating board and after a lot of effort managed to get it out.
Motto:- Don't put anything on the top of the seat back cushions.
All this before 8:30am.
Whilst dismantling the superstructure I came across a "secret" compartment behind the front armrests which I didn't know was there.

It is useful for keeping valuables away from prying eyes when out of the van.
There is one on the other side too.
I had rather more luck with an adapation I made for the TV.
We were on a serviced pitch with TV supplied via the bollard.
Previously in the Orion we had to put the ariel wire through the window into the back of the TV to get reception off the site supply.
As the Cadiz has an exterior satellite point I attached a satellite plug to coax converter to it and plugged in the coax from the bollard.
Up at the business end I purchased a three way splitter off E-Bay,disconnected the blue tagged wire from the Vision Plus signal amplifier ( this blue tagged wire comes from the "satellite in" on the side of the van ) and plugged it into the inward side of the splitter.
Then I disconnected the two wires that feed the two TV points and connected them to the outward part of the splitter ( see pic ).

It all worked rather surprisingly well and is easier to do than explain.
I am going to do the shelf repair later in the week when I have located some suitable bolts so will post on how it went.
Ian
Tuesday, 9 June 2015
Bailey Parts, An Idea.
In my humble opinion Bailey Parts Direct are pretty much on the ball in my experience.
The one drawback is the £6 postage charge when only a small item is wanted.
I thought it may be a good idea if anyone wanted a small item they could e-mail me,I would put it on the blog and anyone who was shopping for a bigger item could include it in their order and post it on.
Of course the secondary postage and cost of the item etc. would need to be reimbursed but for a small item the postage would come to much less than £6.
Now to the selfish bit.
I want about 20 of these:-
Mendip Ash Stickers
SWMBO has found a couple of screw holes where they have become detached so I will order a good few just in case as she keeps going on about it,it's only a pounds worth.
So any further small orders drop me an e-mail and we will see how it goes.
Ian
The one drawback is the £6 postage charge when only a small item is wanted.
I thought it may be a good idea if anyone wanted a small item they could e-mail me,I would put it on the blog and anyone who was shopping for a bigger item could include it in their order and post it on.
Of course the secondary postage and cost of the item etc. would need to be reimbursed but for a small item the postage would come to much less than £6.
Now to the selfish bit.
I want about 20 of these:-
Mendip Ash Stickers
SWMBO has found a couple of screw holes where they have become detached so I will order a good few just in case as she keeps going on about it,it's only a pounds worth.
So any further small orders drop me an e-mail and we will see how it goes.
Ian
Oh I Almost Forgot...................
When we had the Orion I purchased a Bailey wheel arch cover as someone on the next pitch at the time had one and it looked rather smart.
He warned me that they were a complete bugger to put on and he wasn't far wrong.
A good three quarters of an hour,cut fingers,broken nails,broken temper etc.
Anyway like complete idiot who never learns his lesson,I bought one for the Cadiz and was looking forward to a repeat performance.
Bailey Wheel Arch Cover
Surprise,surprise.
Bailey must have listened to someone as the Cadiz model slips on with no problem at all in a couple of minutes.
It looks like they have used smaller diameter beading in this version.
So if you were contemplating one don't hold back.
Ian
He warned me that they were a complete bugger to put on and he wasn't far wrong.
A good three quarters of an hour,cut fingers,broken nails,broken temper etc.
Anyway like complete idiot who never learns his lesson,I bought one for the Cadiz and was looking forward to a repeat performance.
Bailey Wheel Arch Cover
Surprise,surprise.
Bailey must have listened to someone as the Cadiz model slips on with no problem at all in a couple of minutes.
It looks like they have used smaller diameter beading in this version.
So if you were contemplating one don't hold back.
Ian
Subscribe to:
Posts (Atom)